
Ảnh PHOTOSHOP
Showing posts with label PHOTOSHOP. Show all posts
Showing posts with label PHOTOSHOP. Show all posts


Photoshop Tutorials #1 - Learning to Work With Photoshop
82 Video Files | 8.88 Gb (2 DVD)
Video Giới Thiệu: Video Preview

Ngoài công cụ Background Eraser, Photoshop còn có sáu phương pháp tách nền khác.
Tùy vào từng trường hợp mà chọn lựa dùng các phương pháp sao cho hiệu quả nhất, các phương pháp như sau:
1. Nhóm công cụ Lasso
2. Công cụ Magic Wand
3. Công cụ Pen
4. Quick Mask
5. Lệnh Color Range
6. Công cụ Backgound Eraser và Magic Eraser
7. Lệnh Extract
1. Nhóm công cụ Lasso
2. Công cụ Magic Wand
3. Công cụ Pen
4. Quick Mask
5. Lệnh Color Range
6. Công cụ Backgound Eraser và Magic Eraser
7. Lệnh Extract
 |
 |
2. Dùng công cụ Magic Wand:
Khi màu của đối tượng và màu của nền có vẻ khác nhau và nền đa số một màu thì bạn dùng cc này là nhanh nhất, giá trị Tolerance trên thanh thuộc tính bạn để càng lớn thì nó sẽ lấy thêm các pixel màu lân cận nên vùng chọn của bạn sẽ rộng ra và ngược lại. Giá trị Tolerance mặc định là 32. Nhấn Shift+F7 (đảo vùng chọn) để chọn lại đối tượng nếu lúc đầu click vô cái nền trước. Sử dụng kết hợp với cc Lasso để chỉnh sửa lại vùng chọn.
Khi màu của đối tượng và màu của nền có vẻ khác nhau và nền đa số một màu thì bạn dùng cc này là nhanh nhất, giá trị Tolerance trên thanh thuộc tính bạn để càng lớn thì nó sẽ lấy thêm các pixel màu lân cận nên vùng chọn của bạn sẽ rộng ra và ngược lại. Giá trị Tolerance mặc định là 32. Nhấn Shift+F7 (đảo vùng chọn) để chọn lại đối tượng nếu lúc đầu click vô cái nền trước. Sử dụng kết hợp với cc Lasso để chỉnh sửa lại vùng chọn.
 |
3. Dùng công cụ Pen:
Cc này về vẽ vời cơ bản thì chắc bạn nào cũng thạo rùi hén, chọn tùy chọn Paths cho khỏi sinh ra Shape layers lung tung, vẽ xong bạn nhấn Ctrl+Enter để chuyển thành vùng chọn là được. Dùng cc này thích hợp cho ảnh có màu đối tượng và nền phức tạp và gần giống nhau, nhưng với kiểu tóc người tung bay trong gió mà dùng cc này vẽ chắc gãy tay luôn quá
Cc này về vẽ vời cơ bản thì chắc bạn nào cũng thạo rùi hén, chọn tùy chọn Paths cho khỏi sinh ra Shape layers lung tung, vẽ xong bạn nhấn Ctrl+Enter để chuyển thành vùng chọn là được. Dùng cc này thích hợp cho ảnh có màu đối tượng và nền phức tạp và gần giống nhau, nhưng với kiểu tóc người tung bay trong gió mà dùng cc này vẽ chắc gãy tay luôn quá
 |
4. Dùng Quick Mask:
Nhấn phím “Q” để chuyển sang chế độ Quick Mask sau đó dùng cc Brush với cọ tròn tô lên đối tượng. Khi chuyển qua chế độ này thì từ foreground và background dù đang có màu gì cũng chuyển về đen-trắng-xám hết. Nhấn phím “D” để foreground có màu đen, foreground có màu đen thì bạn tô sẽ có một màu đỏ (màu mặc định trong mode này của PTS), foreground màu trắng thì tô lên sẽ xóa đi màu đỏ, mà vùng màu đỏ trên đối tượng sẽ làm vùng chọn do vậy khi đang tô bạn nhấn phím “X” để chuyển đổi qua lại màu đen trắng của foreground nếu khi tô bị lem ra ngoài. Nên dùng cọ cứng nét to tô ở vùng bên trong đối tượng, còn ở gần biên đối tượng nên dùng cọ mềm nét nhỏ. Khi đã tô xong một màu đỏ lên đối tượng cần tách nền, bạn nhấn lại phím “Q” để trở về mode chuẩn, nhấn Shift+F7 để vùng chọn bao quanh đối tượng.
Nhấn phím “Q” để chuyển sang chế độ Quick Mask sau đó dùng cc Brush với cọ tròn tô lên đối tượng. Khi chuyển qua chế độ này thì từ foreground và background dù đang có màu gì cũng chuyển về đen-trắng-xám hết. Nhấn phím “D” để foreground có màu đen, foreground có màu đen thì bạn tô sẽ có một màu đỏ (màu mặc định trong mode này của PTS), foreground màu trắng thì tô lên sẽ xóa đi màu đỏ, mà vùng màu đỏ trên đối tượng sẽ làm vùng chọn do vậy khi đang tô bạn nhấn phím “X” để chuyển đổi qua lại màu đen trắng của foreground nếu khi tô bị lem ra ngoài. Nên dùng cọ cứng nét to tô ở vùng bên trong đối tượng, còn ở gần biên đối tượng nên dùng cọ mềm nét nhỏ. Khi đã tô xong một màu đỏ lên đối tượng cần tách nền, bạn nhấn lại phím “Q” để trở về mode chuẩn, nhấn Shift+F7 để vùng chọn bao quanh đối tượng.
5. Dùng lệnh Color Range: Select > Color Range, lệnh này rất đơn giản mà hữu dụng với những ảnh có màu nền và màu đối tượng phức tạp nhưng giữa chúng có độ tương phản cao. Thường thì nên chọn cái nền để hút màu sẽ dễ làm hơn. Click chọn vào mục Selection, dùng cc Eyedropper trong hộp thoại hút màu ở một điểm trắng nhất (hay đen nhất) trong hình ở khung bên cạnh hoặc đưa ra ngoài file ảnh hút màu ở một điểm sáng nhất (hay tối nhất) của ảnh, sau đó dùng tiếp cc Add to Sample (cũng ở trong hộp thoại, ngay cạnh cc Eyedropper) click vào những vùng màu đen (hay trắng) còn lại cho tới khi nào các vùng ấy chuyển hết thành trắng (đen) mới thôi, khi đó đối tượng cần chọn sẽ là một màu đen (trắng). Nhấp OK và nhấn Shift+F7 để vùng chọn bao quanh đối tượng. Nếu có vùng chọn có bị lem nhem trong ngoài thì dùng nhóm cc Lasso hay Quick Mask với cc Brush tút lại cho ưng ý là xong.
 |
6. Dùng công cụ Backgound Eraser và Magic Eraser:
Công cụ Background Eraser: là công cụ cho phép xóa được layer Background đã khóa thành layer trong suốt. Thích hợp cho ảnh có nền một màu chẳng hạn như hình chân dung người có tóc mai bay tứ tung trên nền một màu thì dùng công cụ này rất là OK, đảm bảo là không mất một sợi tóc nào (dĩ nhiên là màu tóc và màu nền phải tương phản nhau). Cách sử dụng như sau: Trên thanh thuộc tính chọn ở mục Limits là Discontiguous và không check chọn vào Protect Foreground Color, Dùng cọ nét mềm. Trước tiên nhấp chọn Sampling: Continuous rồi click một cái vào vùng màu nền muốn loại bỏ, sau đó trở lại thanh thuộc tính nhấp vào Sampling: Background Swatch và thoải mái xóa bỏ cái nền đó thôi, nhưng tốt nhất là chỉ nên click chấm chấm từ từ thôi chứ đừng xóa "cái ào" nha, bạn sẽ thấy kết quả thật bất ngờ đó (chú ý là ở chỗ nào màu của đối tượng và màu nền không tương phản nhau mấy thì bạn xóa nhẹ nhẹ và đừng quá lấn vào trong nhé, như hình của mình là ở chỗ cái mũi đó. Khi đã xóa xong và đưa đối tượng qua một cái nền khác nếu thấy còn sót lại chút ít của cái nền cũ thì dùng công cụ Eraser nét cọ biên mềm xóa nó đi nhé)
Công cụ Background Eraser: là công cụ cho phép xóa được layer Background đã khóa thành layer trong suốt. Thích hợp cho ảnh có nền một màu chẳng hạn như hình chân dung người có tóc mai bay tứ tung trên nền một màu thì dùng công cụ này rất là OK, đảm bảo là không mất một sợi tóc nào (dĩ nhiên là màu tóc và màu nền phải tương phản nhau). Cách sử dụng như sau: Trên thanh thuộc tính chọn ở mục Limits là Discontiguous và không check chọn vào Protect Foreground Color, Dùng cọ nét mềm. Trước tiên nhấp chọn Sampling: Continuous rồi click một cái vào vùng màu nền muốn loại bỏ, sau đó trở lại thanh thuộc tính nhấp vào Sampling: Background Swatch và thoải mái xóa bỏ cái nền đó thôi, nhưng tốt nhất là chỉ nên click chấm chấm từ từ thôi chứ đừng xóa "cái ào" nha, bạn sẽ thấy kết quả thật bất ngờ đó (chú ý là ở chỗ nào màu của đối tượng và màu nền không tương phản nhau mấy thì bạn xóa nhẹ nhẹ và đừng quá lấn vào trong nhé, như hình của mình là ở chỗ cái mũi đó. Khi đã xóa xong và đưa đối tượng qua một cái nền khác nếu thấy còn sót lại chút ít của cái nền cũ thì dùng công cụ Eraser nét cọ biên mềm xóa nó đi nhé)
 |
 |
 |
- Công cụ Magic Eraser: xóa vùng ảnh có màu tương đồng, công cụ này thích hợp để xóa cái nền cho một vài trường hợp rất nhanh, dùng tương tự như cc Magic Wand nhưng nhanh hơn là ở chỗ bạn xóa được liền không cần thành vùng chọn rồi mới xóa đi, thấy được ngay nền trong suốt trên cả layer Background đang khóa và không cần phải nhấn giữ Shift để chọn vùng nền tiếp theo. Tuy nhiên biên của vùng đã xóa bị răng cưa không đẹp (phải mất công dùng cc Blur để tút lại đường biên nữa) và có lắm lúc còn sót lại màu nền trên đối tượng và lại phải dùng cc Eraser xóa bỏ tiếp. Chú ý giá trị của Tolerance trên thanh thuộc tính nhé, để giá trị nhỏ nếu vùng nền khép kín cần xóa nhỏ. Mình ví dụ hình này, chọn hình dễ cho nó nhanh hén (phần nền trắng chỗ cái lá chỉnh lại Tolerance nhỏ thôi chứ không nó xóa luôn cả mấy cái lá đi hết đó)
 |
7. Lệnh Extract:
Filter > Extract (Alt+Ctrl+X), lệnh này có thể dùng để cắt tóc người, lông con vật… khi nền không phải là cùng một màu. Trong hộp thoại hiện ra, bạn dùng công cụ đầu tên Edge Highlighter vẽ một đường viền khép kín xung quanh đối tượng cần cắt, sau đó dùng tiếp công cụ Fill (ở vị trí thứ hai) click vào bên trong đối tượng để tô. Nhấp Preview để xem trước thử rồi dùng các công cụ kế tiếp chỉnh sửa lại. Khi đã ưng ý rồi nhấp OK để ra ngoài file làm việc, đối tượng được cắt ra thường sẽ bị mất và dư phần nào đó do vậy bạn tiếp tục dùng công cụ History Brush (Y) và Eraser với nét cọ mềm để lấy lại vùng đối tượng đã mất và bỏ bớt đi vùng nền còn dính theo đối tượng. Chú ý là cái hình bạn muốn tách đối tượng ra khỏi nền phải là hình nguyên xi mới mở ra chứ ko được crop xong rồi mới làm đâu nhé, vì như vậy nó sẽ báo lỗi và ko cho dùng công cụ History Brush.
Filter > Extract (Alt+Ctrl+X), lệnh này có thể dùng để cắt tóc người, lông con vật… khi nền không phải là cùng một màu. Trong hộp thoại hiện ra, bạn dùng công cụ đầu tên Edge Highlighter vẽ một đường viền khép kín xung quanh đối tượng cần cắt, sau đó dùng tiếp công cụ Fill (ở vị trí thứ hai) click vào bên trong đối tượng để tô. Nhấp Preview để xem trước thử rồi dùng các công cụ kế tiếp chỉnh sửa lại. Khi đã ưng ý rồi nhấp OK để ra ngoài file làm việc, đối tượng được cắt ra thường sẽ bị mất và dư phần nào đó do vậy bạn tiếp tục dùng công cụ History Brush (Y) và Eraser với nét cọ mềm để lấy lại vùng đối tượng đã mất và bỏ bớt đi vùng nền còn dính theo đối tượng. Chú ý là cái hình bạn muốn tách đối tượng ra khỏi nền phải là hình nguyên xi mới mở ra chứ ko được crop xong rồi mới làm đâu nhé, vì như vậy nó sẽ báo lỗi và ko cho dùng công cụ History Brush.
 |
 |
 |
Khi dùng các cc Lasso, Magic Wand, Pen, lệnh Color Range thì khi đã có vùng chọn ưng ý rồi thì bạn nhớ để Feather cho vùng chọn này khoảng 2px cho ảnh có độ phân giải 300ppi nhé (không ổn thì Constract lại, dpg thấp hơn thì Feather ít hơn) để biên của đối tượng không bén quá và nhìn tự nhiên hơn khi đưa nó qua nền mới.


Step 1: Create a new document

Create a new document (Ctrl+N) in Photoshop with the size 1200px by 750px. Then select the Gradient Tool (G) and draw a gradient #792700 to #000000 from the top to the bottom of your document.
Step 2: Add some colors to your background

Create a new layer, select the Brush Tool (B), select a soft brush with the diameter 300px and add some colors to your layout. I have used red, orange and blue. Name this layer "color."
Step 3: Add a texture to the background

Now we are going to create a texture for our background. Open in Photoshop the leafs image which you have downloaded at the beginning of the tutorial and move it into your document using the Move Tool (V). Right-click on this layer and select Convert to Smart Object. Then go to Filter > Artistic > Film Grain and use the settings from the following image. Then go to Filter > Pixelate > Mosaic, and again use the settings from the following image. Set the blend mode for this layer to Difference, the opacity to 30% and name it "texture"
Step 4: Create a dark background for the content

Create a new layer, select the Rounded Rectangle Tool (U), set the Radius to 3 pixels and create a rounded black rectangle. Then double-click on this layer to open the Layer Style window and use the settings from the following image for Drop Shadow. Set the opacity of this layer to 70% and name it "black shape."
Step 5: Use groups to organize your layers

Hold down the Ctrl key and select all the layers which you have created until now and then group them (Ctrl+G). Name the group "background."
Step 6: Create more groups

Create a new group (Layer > New > Group) and name it "home." Then create another group inside the "home" group and name it "logo."
Step 7: Add a logo and a tagline

Create a new layer inside the "logo" group. Then select the Type Tool (T) and write the name of your layout using the color #f4f4f4. Double-click on this layer to open the Layer Style window and use the settings from the following image. Then create a new layer and write a tagline using the color #eeeeee.
Step 8: "Sign up" and "login" buttons

Now we are going to create two buttons in the upper right corner of our layout. Create a new group and name it "Sign up | Login." Then select the Rounded Rectangle Tool (U) and create a rounded rectangle like I did. Double-click on the shape’s layer to open the Layer Style window and use the settings from the following image. Set the foreground color to white and use the Type Tool (T) to write the words "Sign up | Login" on your button. Set the opacity of the text layer to 75%.
Step 9: Create a blue line with the height of 1 px

Create a new group and name it "Navigation." Create a new layer, select the Single Row Marquee Tool and click once on your document to create a selection with the height of 1px. Fill that selection with the color #406f94 and delete what is outside of the black rectangle using the Rectangular Marquee Tool (M). Set the opacity of this layer to 40% and name it "Line."
Step 10: Add a gradient to the navigation bar

Create a new layer, select the Rectangular Marquee Tool (M) and create a selection like I did (note: you can use some guides to help you create the selection). Then select the Gradient Tool (G) and draw a gradient #35423e to transparent from the bottom to the top of the selection. Hit Ctrl+D to deselect. Then go to Filter > Noise > Add Noise and use the settings from the following image. Name this layer "gradient" and leave a distance of 1 pixel between the line and the gradient.
Step 11: Write the names of your layout’s pages

Select the Type Tool (T) and write the names of your layout’s pages in the navigation bar. Then double-click on the text layer to open the Layer Style window and use the settings from the next image. The font which I have used is called Greyscale Basic.
Step 12: Create a separator

Now we are going to create a separator. Create a new layer, select the Single Column Marquee Tool and click once on your layout. Then select the Rectangular Marquee Tool (M), click on the "Intersect with selection" button from the option bar and create a selection like the one from the next image. Fill the selection with white and hit Ctrl+D to deselect.
Step 13

Double-click on the layer which you have created at the previous step to open the Layer Style window and use the settings from the following image. Name this layer "line 1."
Step 14:

Duplicate the "line 1" layer (Ctrl+J) and name the new layer "line 2." Select the Move Tool (V) and hit once the right arrow on your keyboard to move this layer 1 pixel to the right. Then double-click on the "line 2" layer to open the Layer Style window and use the settings from the following image.
Step 15: Convert the "line 1" and "line 2" layers into a smart object

Hold down the Ctrl key and select the "line 1" and "line 2" layers. Then right-click on one of them and select Convert to Smart Object. Name the smart object "separator."
Step 16: Create a blue highlight

Create a new layer beneath the "separator" layer. Select the Rectangular Marquee Tool (M), create a selection like the one from the following image and fill it with the color #35423e. Right-click on this layer and select Convert to Smart Object. Go to Filter > Blur > Gaussian Blur and use the settings from the next image. Then go to Filter > Noise > Add Noise and again use the settings from the following image. Set the opacity of this layer to 60% and name it "highlight."
Step 17: Create a mask for the "separator" layer

Click on the "separator" layer in the Layers palette to select it and then go to Layer > Layer Mask > Reveal All. Select the Gradient Tool (G) and draw a black to transparent gradient from the top to the middle of your separator.
Step 18: Duplicate the separator

Hold down the Ctrl key and click on the "separator" and "highlight" layers in the Layers palette to select them. Then select the Move Tool (V), hold down the Alt and Shift keys and then click on your document and drag the mouse. Now you have duplicated the selected layers. Use the Move Tool (V) to move these new layers to the right. Repeat this step and create as many separators as you need.
Step 19: Group all the separators

Select all the "separator" and "highlight" layers in the Layers palette and hit Ctrl+G to group them. Name the group "separators."`
Step 20: Create a button for the active page

Now we are going to create a background for the active menu page to differentiate it from the others. Select the Rectangle Tool (U) and create a rectangle like I did. Put this layer beneath the text layer which contains all the pages names. Double-click on this layer and use the settings from the following image for Gradient Overlay. Then name it "active menu" and set its opacity to 50%.
Step 21: Create the search bar

Create a new group (Layer > New > Group), name it "search" and put it above the "navigation" group. Select the Rounded Rectangle Tool (U), set the Radius to 3 px and create a rounded rectangle like I did using the color #104f59. Name this layer "text field" and set its opacity to 80%.
Step 22: Create the search button

Select the Rectangle Tool (U) and create a rectangle like I did. Put this rectangle in the right side of the search bar. Double-click on this layer and use the settings from the following image for Gradient Overlay. Then right-click on this layer and select Create Clipping Mask.
Step 23: Write the word "search" on your button

Select the Type Tool (T) and write the word "search" using the white color. Set the opacity of this layer to 75%.
Step 24: Create a vertical line for the search bar

Select the Line Tool (U) and create a vertical line using the color #123036. Name this layer "line", put it beneath the "button" layer and move it between the search bar and the button using the Move Tool (V).
Step 25: Create a blue rectangle

Create a new group (Layer > New > Group) and name it "Showcase." Create another group inside this one and name it "background." Select the Rectangle Tool (U) and create a rectangle using the color #219aad. My rectangle is 983 px wide by 273 px height (you may want to open the Info palette - Window > Info – before you create the rectangle, so you can see the exact size of your rectangle). Set the opacity of this layer to 55% and name it "bg4."
Step 26: Add a texture to the blue rectangle

Open in Photoshop the "pixelated blue rectangle" image, move it into your document and put this image above your blue rectangle. Set the opacity of this layer to 55% and name it "bg3."
Step 27: Add a gradient to the blue rectangle

Ctrl-click on the "bg4" layer’s vector mask to select it, then create a new layer, select the Gradient Tool (G) and draw a gradient #56b8e5 to transparent from the bottom to the top of your selection. Then hit Ctrl+D to deselect.
Step 28: Create a smaller blue rectangle

Create a new layer, select the Rectangular Marquee Tool (M) and create a selection like I did. Select the Gradient Tool (G) and draw a gradient #0f2b42 to #2a607f from the bottom to the top of your selection. Then hit Ctrl+D to deselect. Name this layer "bg1."
Step 29: "Sign up" button

Create a new group (Layer > New > Group) and name it "sign up button." Select the Rounded Rectangle Tool (U), set the Radius to 2 px and create a rounded rectangle like I did. Double-click on this layer to open the Layer Style window and use the settings from the following image. Then select the Type Tool (T) and write the words "sign up" using the white color.
Step 30: "Learn more" button

Repeat the previous step to create another button, but this time write the words "learn more" on your button. Then create a new layer, select the Custom Shape Tool (U) and create a white arrow like I did.
Step 31: Create a button in the left side of the rectangle

Create a new group (Layer > New > Group) and name it "left arrow." Select the Ellipse Tool (U) and create a circle using the color #406f94. Double-click on this layer to open the Layer Style window and use the settings from the following image.
Step 32: Create an arrow inside the blue circle

Create a new layer and use the Custom Shape Tool (U) to create a white arrow. Double-click on this layer to open the Layer Style window and use the settings from the following image. Set the opacity of this layer to 50%.
Step 33: Create another arrow in the right side of the rectangle

Repeat the previous two steps to create another arrow in the right side of the blue rectangle.
Step 34: Create a featured image

Create a new group (Layer > New > Group) and name it "image." Put a small image in this group and name the layer "image." Double-click on this layer to open the Layer Style window and use the settings from the following image.
Step 35: Add a shadow to your image

Go to Layer > Layer Style > Create Layer. This will create a new layer beneath the original one with the style of that original layer. Now go to Layer > Layer Mask > Reveal All, select the Gradient Tool (G) and draw a black to transparent gradient from the bottom to the middle of your small image. Name this layer "shadow."
Step 36: Add some text

Create a new group (Layer > New > Group), select the Type Tool (T) and add some text. Name this group "text."
Step 37: Create a white rectangle

Create a new group and name it "content." Create another group inside this one and name it "shadows." Select the Rectangle Tool (U) and create a rectangle like I did using the white color. Name this layer "white shape" and set its opacity to 90%.
Step 38: Add a top shadow

Ctrl-click on the vector mask of the "white shape" layer to select it. Then create a new layer, select the Gradient Tool (G) and draw a gradient #8f8f8f to transparent like I did. Set the opacity of this layer to 50% and name it "top shadow." Then select the Move Tool (V) and hit the down arrow on your keyboard two times.
Step 39: Create two vertical shadows

Create a new layer and use the Rectangular Marquee Tool (M) to create a selection like I did. Then use the Gradient Tool (G) to draw a gradient #8f8f8f to transparent like I did. Add a mask to this layer and use a big black soft brush to mask the center of the shadow. Set the opacity of this layer to 30% and name it "vertical shadow 1." Duplicate this layer (Ctrl+J), name the new layer "vertical shadow 2" and move it to the right.
Step 40: Create a horizontal line

Select the Line Tool (U) and create a horizontal like with the weight of 1 px and the color #aebcc7. Name this layer "line."
Step 41: Add some text

Select the Type Tool (T) and write the content of your layout. You can also use images and anything else you want.
Step 42: Create a gradient for the footer

Create a new group and name it "footer." Create a new layer inside this group, select the Rectangular Marquee Tool (M) and create a selection like I did. Then set the foreground color to #555555, select a big soft brush and paint with it over the top edge of the selection. Set the opacity of this layer to 50% and name it "gradient."
Step 43: Add a line with the height of 1 px to the footer

Create a new layer, select the Single Row Marquee Tool and click on your document. Fill the selection with white and hit Ctrl+D to deselect. Go to Layer > Layer Mask > Reveal All, select a big black soft brush and mask this layer like I did. Take a look at the following image for reference. Set the opacity of this layer to 15% and name it "line."
Step 44: Add some text to your footer

Select the Type Tool (T) and add some text for your footer.
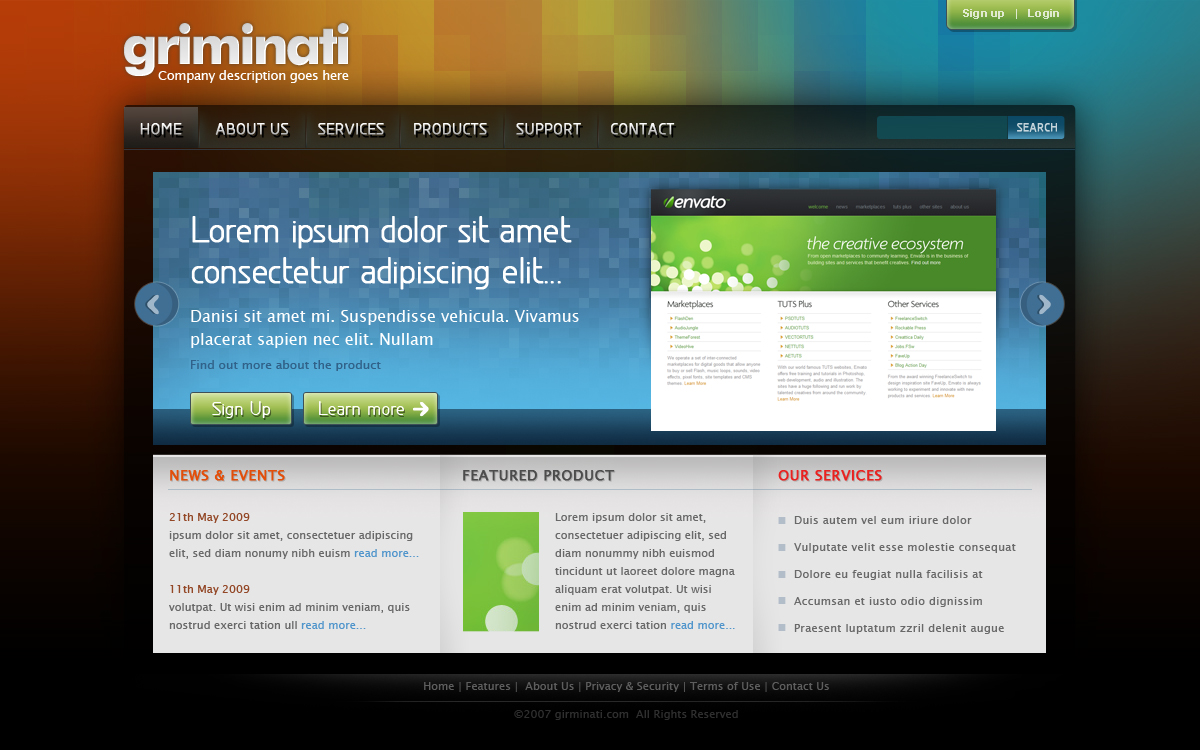
Final Result
Subscribe to:
Posts (Atom)


